
The Importance of Pre-Drywall and Final Walkthrough Inspections
What a Pre-Drywall Inspection Looks For
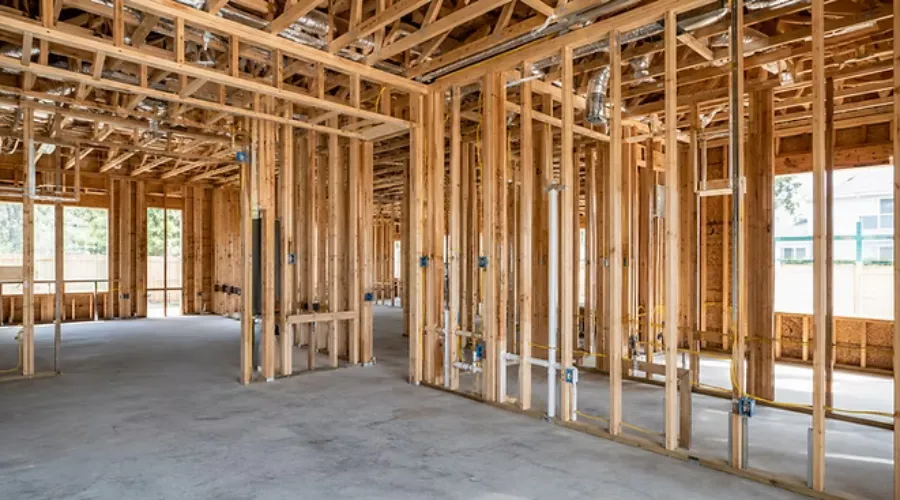
A pre-drywall inspection occurs after the framing, rough electrical, rough plumbing, HVAC, roof, windows, and major mechanical systems are in place, but before insulation and drywall cover them. This is one of the most valuable moments in the construction process because the bones of the home are still visible. An inspector can look at the structure and systems before they become hidden.
A good pre-drywall inspection may include a review of:
Framing components and visible structural connections
Roof framing and accessible attic areas
Window and door installation
Plumbing supply and drain lines
Electrical wiring, panel location, and outlet placement
HVAC ductwork, returns, and register locations
Fire blocking and draft stopping where visible
Exterior wall penetrations
Moisture concerns before walls are closed
Insulation readiness
General workmanship and missing items
The pre-drywall inspection gives a home inspection professional a chance to review visible work before the builder closes up the home. That timing matters. A missing fire block, damaged framing member, poorly placed duct, or plumbing line installed too close to the edge of a stud may be much harder to confirm later. In some cases, repairs after drywall can mean cutting into finished walls.
Why Pictures Are So Valuable Before Drywall
Photos are not just nice to have. They can become one of the most useful records of the entire build. During a pre-drywall inspection, pictures can show where important systems are located before the walls are covered. Years later, that record can help when hanging cabinets, adding wiring, repairing plumbing, or tracking moisture concerns.
Good photo documentation may capture:
Pipe routes inside walls
Electrical wire paths
Stud layout
Blocking locations
HVAC duct placement
Shower valve locations
Areas repaired before drywall
Manufacturer labels or installation details
Potential defects found during the inspection
These pictures also help with communication. A written report is useful, but a photo of a damaged truss plate, pinched duct, or missing nail pattern can make the concern much easier to understand.
A clear inspection photo turns a vague concern into a specific construction item that can be discussed, repaired, and verified.
Photos also reduce confusion between the buyer, inspector, builder, and project manager. Instead of saying, “There is an issue in the upstairs wall,” the report can show the exact wall, location, and condition. This paper trail supports better decisions, confidence, peace of mind, trust, and clearer conversations before closing.
Common Issues Found Before Drywall

No new home is perfect. Construction involves many trades, many schedules, and many layers of work. Even quality builders can miss items. A pre-drywall inspection does not assume poor workmanship. It simply adds another set of trained eyes before the next phase begins.
Common findings may include:
The inspector may find cracked, overcut, or damaged framing members. They may also see missing hangers, improper fasteners, or areas that need clarification from the builder or engineer. Some framing changes happen in the field during construction. That does not always mean there is a problem, but questionable changes should be reviewed before they are covered.
Plumbing lines that are too close to the edge of a stud can be vulnerable to drywall screws or nails. Drain lines may lack proper support. Tub and shower valves may be set at the wrong depth. These details are easier to correct before walls are finished.
A pre-drywall inspection may reveal loose wiring, missing nail plates, unsupported cables, or outlet and switch locations that do not match the plan. Inspectors do not replace the municipal code inspection, but they can often spot visible concerns and document conditions for the builder to review.
Ductwork can be kinked, crushed, poorly supported, or disconnected. Register locations may not make sense for the room layout. Return air pathways may need attention. Comfort problems are frustrating after move-in. Finding duct issues early can help reduce future hot and cold spots.
Window flashing, wall penetrations, and roof areas deserve attention. Any visible moisture staining, gaps, or incomplete weather protection should be addressed before insulation and drywall trap the problem.
Why the Final Walkthrough Inspection Still Matters
The final walkthrough inspection happens near the end of construction, usually when the home is mostly finished and close to closing. By this stage, drywall, paint, flooring, cabinets, fixtures, appliances, exterior grading, and most visible finishes should be complete. This inspection is different from the pre-drywall inspection. It does not focus on hidden framing because that work is no longer visible. Instead, it checks how the finished home performs and whether visible components are complete, safe, and functional.
A final walkthrough inspection may include:
Doors, windows, and locks
Floors, walls, ceilings, and trim
Plumbing fixtures and leaks
Electrical outlets, switches, lights, and visible panel items
HVAC operation
Appliances if installed
Attic access and visible insulation areas
Garage doors and safety features
Exterior siding, roofing, grading, and drainage
Stairs, railings, decks, and porches
Cabinets, countertops, tile, and caulking
Drainage around the foundation
Visible cracks, gaps, stains, or damage
The goal is not to nitpick every tiny paint touch-up. The goal is to find incomplete work, safety concerns, installation mistakes, and performance issues while the builder is still actively involved.
The Final Walkthrough Is Not Just a Punch List
Many buyers think the final walkthrough is mainly for blue tape and cosmetic marks. Paint touch-ups matter, but they are only part of the story. A final inspection may identify larger concerns, such as:
A dishwasher that leaks below the cabinet
A sink drain that is not properly connected
Outlets that do not work
A GFCI device that does not trip or reset properly
A window that will not lock
A door that rubs or will not latch
Missing insulation in an attic area
Loose toilets or fixtures
Poor grading that directs water toward the foundation
Damaged shingles or incomplete roof details
HVAC equipment that does not respond as expected
These are the kinds of items that can be annoying, expensive, or difficult to schedule after move-in. Before closing, there is usually more urgency to complete corrections. A professional inspection report can help separate minor cosmetic items from concerns that deserve prompt builder attention.
Pre-Drywall and Final Walkthrough Inspections Work Together
These two inspections are strongest when used as a pair. Each one sees what the other cannot.
Inspection stage
What it can reveal
Why timing matters
Pre-drywall inspection
Framing, rough plumbing, rough electrical, HVAC ducts, blocking, visible structural details
Problems can often be corrected before walls are closed
Skipping the pre-drywall inspection means hidden systems may never receive an independent review. Skipping the final walkthrough inspection means the finished home may have problems that only show up after moving day. Both inspections help create a more complete picture of the home.
What to Photograph During Each Inspection
Pictures should be clear enough to identify the location and the issue. A good inspection report usually includes wide photos for context and close-up photos for detail.
For pre-drywall, useful pictures include:
Each room from multiple angles
Major plumbing walls
Electrical panel area
Kitchen and bathroom wall cavities
Shower and tub valve walls
HVAC equipment and duct routes
Attic framing and roof structure where visible
Any damaged or questionable framing
Exterior penetrations before covering
Areas the builder repairs before drywall
For the final walkthrough, useful pictures include:
Model and serial labels for installed equipment
Active leaks or water staining
Damaged finishes
Missing caulk or grout gaps
Cracked windows or damaged doors
Electrical concerns
Attic insulation concerns
Exterior drainage and grading
Roof or siding concerns visible from safe locations
Any unfinished or incomplete item
Pictures should not replace the inspection report. They support it. The report should explain what the photo shows, where the issue is located, and why it matters.
Why Buyers Should Not Rely Only on Municipal Inspections
Municipal inspections are useful, but they are not the same as a private home inspection. City or county inspectors usually check for code-related items at required stages. Their role is important, but their time on-site may be limited, and their focus is not the same as a buyer’s private inspection.
A private inspector works for the client who hired them. The inspection is more detailed from the buyer’s point of view. It may include practical items that matter for comfort, maintenance, durability, and daily use. The builder may also have internal quality checks. Those can be helpful, but they are not independent. A private inspection adds a separate review.
That does not mean the builder is trying to hide anything. It means construction is complicated, and extra review helps catch items before they become bigger problems.
How to Handle Inspection Findings with the Builder
The best approach is practical and documented. Once the inspection report is ready, review the findings and focus on items that are incomplete, unsafe, damaged, improperly installed, or likely to create future problems.
A simple process works best:
Send the report to the builder or construction manager.
Ask which items will be corrected.
Request clarification on any item the builder disputes.
Keep written records of responses.
Recheck important repairs before drywall or closing.
Save the report and photos for future reference.
Some findings may be code-related. Some may be workmanship concerns. Some may need evaluation by a licensed trade or engineer. The inspector can identify concerns, but the builder and qualified trades usually perform the corrections.
Stay calm and specific. A good report with pictures helps keep the conversation focused on the home, not opinions.
What a Good Inspection Report Should Include

A strong inspection report should be clear, organized, and easy to follow. It should not be a pile of random photos with no explanation. Look for a report that includes:
The date and stage of construction
Areas inspected and limitations
Photos with location details
Clear descriptions of concerns
Safety or function concerns separated from minor items
Recommendations for builder review or qualified trades
Enough detail to recheck repairs later
For new construction, the report should also respect the fact that some work may still be in progress. The inspector should be able to distinguish between incomplete construction and a true concern.
The Biggest Reasons to Schedule Both Inspections
A new home is one of the largest purchases most people make. It deserves more than a quick look before signing final paperwork. The main reasons to schedule both inspections are simple:
Hidden work gets reviewed before it disappears
Finished systems get tested before closing
Photos create a useful record of the build
Repair requests are clearer and easier to track
The builder has a chance to correct problems earlier
Future maintenance becomes easier with wall cavity photos
Small issues are less likely to become larger repair projects
The pre-drywall inspection protects the unseen parts of the home. The final walkthrough inspection protects the finished product. Together, they give a fuller view of quality, function, and completion.
A Better Way to Reach Closing Day
A new construction home should feel exciting, not uncertain. Inspections do not remove every possible risk, and they do not guarantee perfection. They do give you a clearer understanding of what was built, what still needs attention, and what has been documented before move-in.
Schedule the pre-drywall inspection before the walls are closed. Schedule the final walkthrough inspection before closing. Save the reports and photos. That record can help on closing day, during the builder warranty period, and years later when repairs or upgrades come up. For a home that is still being built, timing is everything.

Elijah Proctor
Owner / Inspector • Birdhouse Home Inspection Services
InterNACHI® Certified Professional Inspector CPI® with 15+ years in construction. Dedicated to helping home buyers and owners across Upstate South Carolina make confident decisions.
Related Articles
Recognizing Mold Signs During a Home Inspection: Identifying Mold During Inspection
When you're about to buy a home or simply want to keep your current one safe, spotting mold early can save you a lot of trouble. Mold is sneaky...
Steps to Book a Certified Home Inspection: Your Guide to Smart Home Buying
Buying a home is exciting, but it can also be a bit nerve-wracking. One of the smartest moves you can make during this process is to get a certified home inspec...
Greenwood Home Inspections: Your Guide to Birdhouse Home Inspection Services
Buying a home is one of the biggest decisions you’ll ever make. It’s exciting, but it can also be nerve-wracking. How do you know if the house you’re eyeing is ...
Frequently Asked Questions
Everything you need to know before booking your inspection. Browse by topic below.
Most inspections take about 2 to 4 hours, depending on the size, age, and condition of the home. Larger or older properties may take a bit longer. We take the time needed to be thorough, so nothing important gets missed!
What Our Neighbors Say
Real reviews from real Upstate South Carolina homeowners.
Upstate South Carolina Service Locations
Proudly serving homeowners, buyers, and real estate professionals across six counties and all surrounding Upstate South Carolina communities. Wherever you are in the Upstate, we'll come to you.
Primary Counties Served
Interactive Service Region Map
“Whether you are buying, selling, or maintaining your home, Birdhouse Home Inspections would be honored to inspect your property. After all, we are going to be neighbors.”
Schedule Your Inspection
Book online in under 2 minutes or call Elijah Proctor directly. Pick a date and time right here — your appointment is confirmed instantly through our secure online scheduler.
Schedule Your Inspection Online
Pick a date & time that works for you — confirmed instantly.
Ready to Protect Your Investment?
Book online in under 2 minutes or call Elijah Proctor directly.